#tailscale #kubernetes #devops
Free Kubernetes Load Balancers with Tailscale
Published Feb 26, 2024 by Lee Briggs
Load Balancers are expensive.
If you’re using Kubernetes, they are also a necessity. Figuring out how to expose a Kubernetes workload to the world without a Load Balancer is a bit like trying to make a sandwich without bread. You can do it, but nobody is going to want to deal with it.
If you’re a startup trying to get your project off the ground, firstly, why are you using Kubernetes? Stop. However, if that’s the way you’re going - you’re looking at spending at least $10 a month for a load balancer in the cloud before you take data transfer costs into account. If you’re a hobbyist running a small Kubernetes cluster in your home lab, you might read the Metal LB documentation and think “I didn’t realise I needed to have a CCIE certification to make this work.”
Well, guess what! You don’t need to anymore. Thanks to Tailscale and it’s relatively new Kubernetes Operator you can now get access to Kubernetes workloads using native Service and Ingress objects without paying those greedy cloud providers a single cent.
A cloud agnostic load balancer
Kubernetes services work on every Kubernetes distribution, but if you want to expose that service to the world, you’ll likely need a service of type=LoadBalancer. Without rehashing Kubernetes networking concepts, this mechanism will ultimately create something with an address that is external to the Kubernetes cluster. Let’s take a look at a very simple example on a DigitalOcean Kubernetes cluster:
apiVersion: apps/v1
kind: Deployment
metadata:
  name: nginx-deployment
spec:
  selector:
    matchLabels:
      app: nginx
  replicas: 2 # tells deployment to run 2 pods matching the template
  template:
    metadata:
      labels:
        app: nginx
    spec:
      containers:
      - name: nginx
        image: nginx:1.14.2
        ports:
        - containerPort: 80
---
apiVersion: v1
kind: Service
metadata:
  name: nginx
  labels:
    app: nginx
spec:
  type: LoadBalancer
  ports:
  - port: 80
  selector:
    app: nginx
Here, we provision a standard Kubernetes deployment and service, and give the service type=LoadBalancer. Inside the Kubernetes cluster, there is a cloud controller manager that watches for services of type LoadBalancer and then provisions a load balancer in the cloud provider’s infrastructure.
You can see the result of this when the Load Balancer has provisioned:
k get svc
NAME         TYPE           CLUSTER-IP      EXTERNAL-IP     PORT(S)        AGE
kubernetes   ClusterIP      10.245.0.1      <none>          443/TCP        9m5s
nginx        LoadBalancer   10.245.97.151   <redacted>   80:31554/TCP   2m54s
If you visit the EXTERNAL-IP you’ll see your application, in this case, nginx.
This is all well and good, but as mentioned earlier, this has provisioned an actual resource in Digital Ocean, a Load Balancer. This is going to cost me at least $12 a month per node, which effectively double the prices of running compute.
As a proud Yorkshireman the idea of paying for something I don’t need to is anathema to me. Until recently, I didn’t have a choice. I had to pay for a load balancer.
Tailscale to the rescue
So let’s see what this could look like with Tailscale. We’ll install the Tailscale operator into our cluster, but first we need to knock out a few small steps.
Create your Tailnet
The first step along this journey is to sign up for Tailscale and create a Tailnet. This is a network that your Kubernetes cluster will join, and allows anyone on the Tailnet to access the Kubernetes cluster.
You should also install the Tailscale client on your device of choice. If you already have a Tailnet, skip to the next section.
Modify your ACL file
Before we connect Tailscale to our cluster, we need to make a few changes to our Tailscale ACL to allow the Tailscale operator to correctly authorize the new devices it’ll create.
Inside the tagOwners section of your Tailnet, you should add the following stanzas:
"tagOwners": {
    "tag:k8s-operator": [],
	"tag:k8s":          ["tag:k8s-operator"],
},
This will allow the Tailscale operator to create new devices and assign them to the correct ACLs.
Create an Oauth client
Next, we need to create some credentials that the Tailscale operator will use to create devices. If you’re wondering why we need to do this, it’ll all make sense shortly. In the Settings tab in the Tailscale console, navigate to Oauth clients and create a new one, with the following settings:
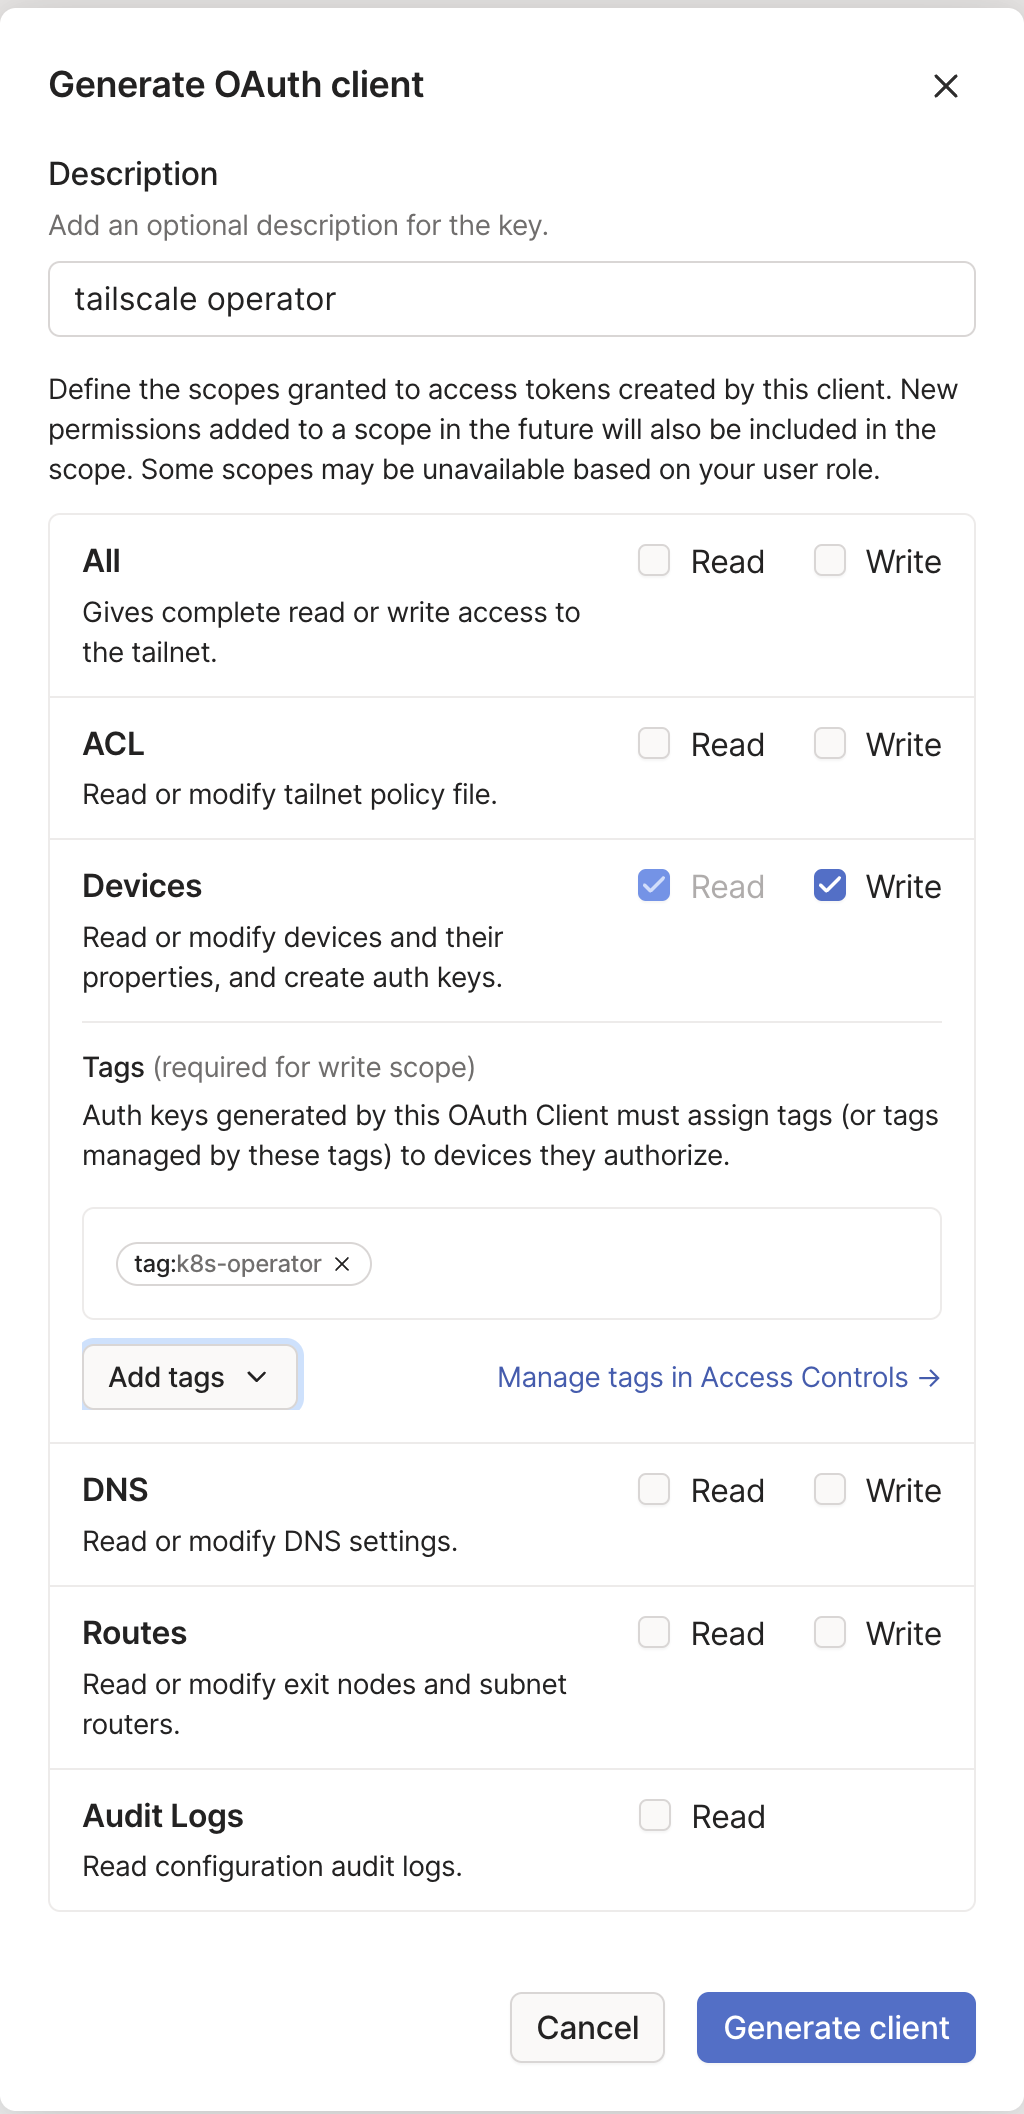
Make a note of the credentials it returns, as you need them for the next step.
Install the Tailscale Operator
Now we have our credentials, we can install the operator. Tailscale handily provides us with a Helm Chart, so let’s go ahead and install it:
helm repo add tailscale https://pkgs.tailscale.com/helmcharts # add the helm chart repo
helm repo update # update the repo
helm upgrade \
  --install \
  tailscale-operator \
  tailscale/tailscale-operator \
  --namespace=tailscale \
  --create-namespace \
  --set-string oauth.clientId=${OAUTH_CLIENT_ID} \
  --set-string oauth.clientSecret=${OAUTH_CLIENT_SECRET} \
Now we can make some magic happen - let’s see how we can connect to our nginx deployment without a LoadBalancer.
Create a LoadBalancer
Let’s deploy an nginx service, but add a single line to the manifest - the loadBalancerClass:
apiVersion: apps/v1
kind: Deployment
metadata:
  name: nginx-deployment
spec:
  selector:
    matchLabels:
      app: nginx
  replicas: 2 # tells deployment to run 2 pods matching the template
  template:
    metadata:
      labels:
        app: nginx
    spec:
      containers:
      - name: nginx
        image: nginx:1.14.2
        ports:
        - containerPort: 80
---
apiVersion: v1
kind: Service
metadata:
  name: nginx
  labels:
    app: nginx
spec:
  loadBalancerClass: tailscale # add this!
  type: LoadBalancer
  ports:
  - port: 80
  selector:
    app: nginx
Wait a few minutes for the operator reconciliation to happen, then check the service:
NAME         TYPE           CLUSTER-IP      EXTERNAL-IP                                    PORT(S)        AGE
kubernetes   ClusterIP      10.245.0.1      <none>                                         443/TCP        28m
nginx        LoadBalancer   10.245.97.151   100.102.166.33,default-nginx.tail7fe3.ts.net   80:31404/TCP   22m
Something truly remarkable has happened here, with absolutely zero input on my part. If you’re on the same Tailnet as the Kubernetes cluster, you can visit the EXTERNAL-IP and see the nginx deployment.
curl default-nginx.tail7fe3.ts.net
<!DOCTYPE html>
<html>
<head>
<title>Welcome to nginx!</title>
<style>
    body {
        width: 35em;
        margin: 0 auto;
        font-family: Tahoma, Verdana, Arial, sans-serif;
    }
</style>
</head>
<body>
<h1>Welcome to nginx!</h1>
<p>If you see this page, the nginx web server is successfully installed and
working. Further configuration is required.</p>

<p>For online documentation and support please refer to
<a href="http://nginx.org/">nginx.org</a>.<br/>
Commercial support is available at
<a href="http://nginx.com/">nginx.com</a>.</p>

<p><em>Thank you for using nginx.</em></p>
</body>
</html>
What exactly has happened here? Let’s examine it a little.
The operator at work
If you have the ability to use the Tailscale CLI, you can run tailscale status and you’ll notice a few devices have appeared in your Tailnet.
tailscale status
100.109.46.90   macbook-pro-lbr      lee@         macOS   -
100.102.166.33  default-nginx        tagged-devices linux   idle, tx 900 rx 1452
100.95.163.103  doks-py-funnel-tailscale-operator tagged-devices linux   -
There’s one for the Tailscale operator I installed, but there’s also a distinct device for my nginx service, that has the same IP as the EXTERNAL-IP of the service. This is the magic of the Tailscale operator - it’s created a device that is accessible from the Tailnet, and it’s done so without needing to provision a cloud resource.
If I take a look in the Tailscale namespace, I can also see what’s actually happened - the operator installed a pod that is responsible for creating these devices:
k get po -n tailscale
NAME                        READY   STATUS    RESTARTS   AGE
operator-6cc69495c6-nck9x   1/1     Running   0          27m
ts-nginx-5jt4h-0            1/1     Running   0          4m1s
Describing that Tailscale pod will give me another interesting nugget of information - check out the Environment section
k get po -n tailscale ts-nginx-5jt4h-0 -o json | jq '.spec.containers[0].env'
[
  {
    "name": "TS_USERSPACE",
    "value": "false"
  },
  {
    "name": "TS_AUTH_ONCE",
    "value": "true"
  },
  {
    "name": "POD_IP",
    "valueFrom": {
      "fieldRef": {
        "apiVersion": "v1",
        "fieldPath": "status.podIP"
      }
    }
  },
  {
    "name": "TS_KUBE_SECRET",
    "value": "ts-nginx-5jt4h-0"
  },
  {
    "name": "TS_HOSTNAME",
    "value": "default-nginx"
  },
  {
    "name": "TS_DEBUG_FIREWALL_MODE",
    "value": "auto"
  },
  {
    "name": "TS_DEST_IP",
    "value": "10.245.97.151"
  }
]
Notice that TS_DEST_IP variable? It’s the IP of the Kubernetes ClusterIP for our service.
Going further
This is all well and good for a simple application, but what if we need HTTPS? How complex can this get? Kubernetes services will do okay for exposing basic TCP passthrough services, but what else can I do.
Well, this let’s try something a bit more interesting.
Create an Ingress
The Tailscale operator will also reconcile Ingress resources, and it’ll handle TLS termination for you as well. You need to allow your Tailnet to create HTTPs certificates first but once you have, you can deploy an ingress just as easily as a service:
apiVersion: apps/v1
kind: Deployment
metadata:
  name: nginx-deployment
spec:
  selector:
    matchLabels:
      app: nginx
  replicas: 2 # tells deployment to run 2 pods matching the template
  template:
    metadata:
      labels:
        app: nginx
    spec:
      containers:
      - name: nginx
        image: nginx:1.14.2
        ports:
        - containerPort: 80
---
apiVersion: v1
kind: Service
metadata:
  name: nginx
  labels:
    app: nginx
spec:
  type: ClusterIP # previously was a load balancer
  # also ensure you remove the loadBalancerClass line
  ports:
  - port: 80
  selector:
    app: nginx
---
apiVersion: networking.k8s.io/v1
kind: Ingress
metadata:
  name: nginx
spec:
  defaultBackend:
    service:
      name: nginx
      port:
        number: 80
  ingressClassName: tailscale
  tls:
  - hosts:
    - nginx
Now, wait for the operator to reconcile, and then examine your ingress:
NAME    CLASS       HOSTS   ADDRESS                 PORTS     AGE
nginx   tailscale   *       nginx.tail7fe3.ts.net   80, 443   22s
Look at that!
curl https://nginx.tail7fe3.ts.net
<!DOCTYPE html>
<html>
<head>
<title>Welcome to nginx!</title>
<style>
    body {
        width: 35em;
        margin: 0 auto;
        font-family: Tahoma, Verdana, Arial, sans-serif;
    }
</style>
</head>
<body>
<h1>Welcome to nginx!</h1>
<p>If you see this page, the nginx web server is successfully installed and
working. Further configuration is required.</p>

<p>For online documentation and support please refer to
<a href="http://nginx.org/">nginx.org</a>.<br/>
Commercial support is available at
<a href="http://nginx.com/">nginx.com</a>.</p>

<p><em>Thank you for using nginx.</em></p>
</body>
</html>
No need to install an ingress controller, no need to provision a cloud resource. Just a simple ingress resource and the Tailscale operator does the rest.
Public Services
So far, we’ve provisioned workloads that are only accessible on the same Tailnet. What if you want to expose a service to the wider internet?
Tailscale already has an amazing feature for this called Funnel and you can leverage this feature from the operator to make your applications accessible from anywhere in the world.
Add ACL permissions
You need to make a slight modification your Tailscale ACL file to use this feature. Add a block to your ACL like so:
"nodeAttrs": [
	{
		"target": ["tag:k8s"], // tag that Tailscale Operator uses to tag proxies; defaults to 'tag:k8s'
		"attr":   ["funnel"],
	},
],
Once you’ve updated your ACL, you need to make a single line change to any service or ingress.
Modify your service or ingress
apiVersion: apps/v1
kind: Deployment
metadata:
  name: nginx-deployment
spec:
  selector:
    matchLabels:
      app: nginx
  replicas: 2
  template:
    metadata:
      labels:
        app: nginx
    spec:
      containers:
      - name: nginx
        image: nginx:1.14.2
        ports:
        - containerPort: 80
---
apiVersion: v1
kind: Service
metadata:
  name: nginx
  labels:
    app: nginx
spec:
  type: ClusterIP
  ports:
  - port: 80
  selector:
    app: nginx
---
apiVersion: networking.k8s.io/v1
kind: Ingress
metadata:
  name: nginx
  annotations:
    tailscale.com/funnel: "true" # add this annotation
spec:
  defaultBackend:
    service:
      name: nginx
      port:
        number: 80
  ingressClassName: tailscale
  tls:
  - hosts:
    - nginx
This annotation works on both services and ingress objects. Once applied, you can logout of your Tailnet, and still get access to the service:
# log out of my tailnet
tailscale logout
# get the ingress url
 k get ing
NAME    CLASS       HOSTS   ADDRESS                 PORTS     AGE
nginx   tailscale   *       nginx.tail7fe3.ts.net   80, 443   7m53s

# check access ingress
curl https://nginx.tail7fe3.ts.net
Magic!
Caveats
This is all incredibly powerful, and will save you money. However, there are 2 caveats worth mentioning
Supported URLs
Currently, the URLs generated for both services and ingresses are only tailnet addresses, so support for your own domain is currently not possible.
Ingress HTTPs
There is currently no mechanism to redirect HTTP requests to HTTPS. If you need that sort of functionality, you’ll need to provision an ingress controller. You can expose the ingress controller with a Tailnet service though, more to come on that in another post.
Wrapping Up
Tailscale really has made it incredibly easy to expose your Kubernetes workloads to the world without needing to provision cloud resources. This is only the beginning for what the operator can do, so watch this space for more exciting forays into the world of Tailscale and Kubernetes.
© 2021, Ritij Jain | Pudhina Fresh theme for Jekyll.